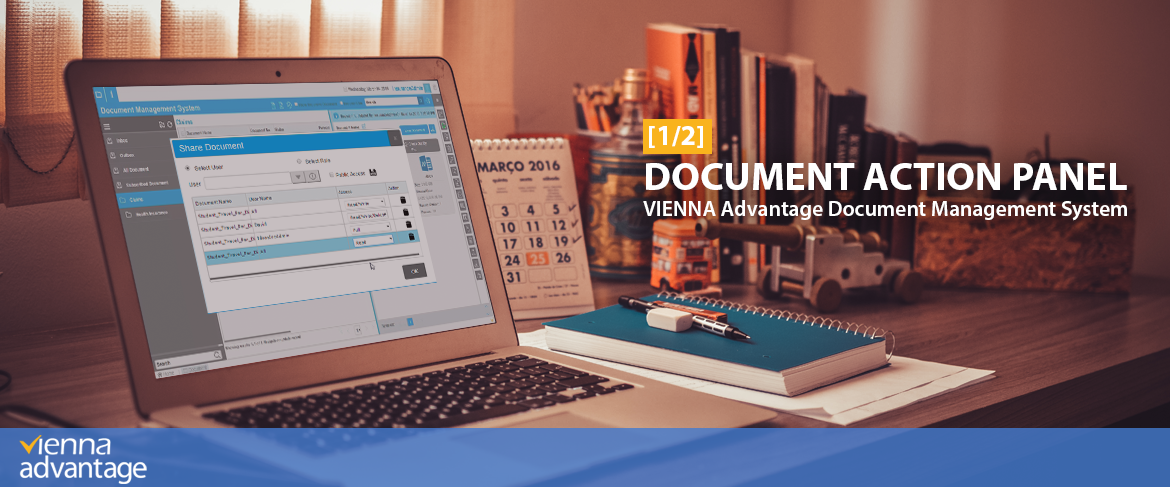
The Document Action Panel is the place that enables you to add, view, edit and manage the documents. This panel contains different action buttons which are used for management of a selected document. In this article we will showcase the first 7 buttons of the document action panel.
SUGGESTION!
This is the 5th article of a series of articles related to our Document Management System. Before starting to read it we suggest to check the previous articles about VIENNA Advantage Document Management Solution. Explore the full list of articles here: Document Management Tips
Document Action Panel
The Document Action Panel is located in the right upper side of the DMS module window. This panel contains different action buttons which are used for management of the selected document. In the picture below you may find the full list of action buttons.
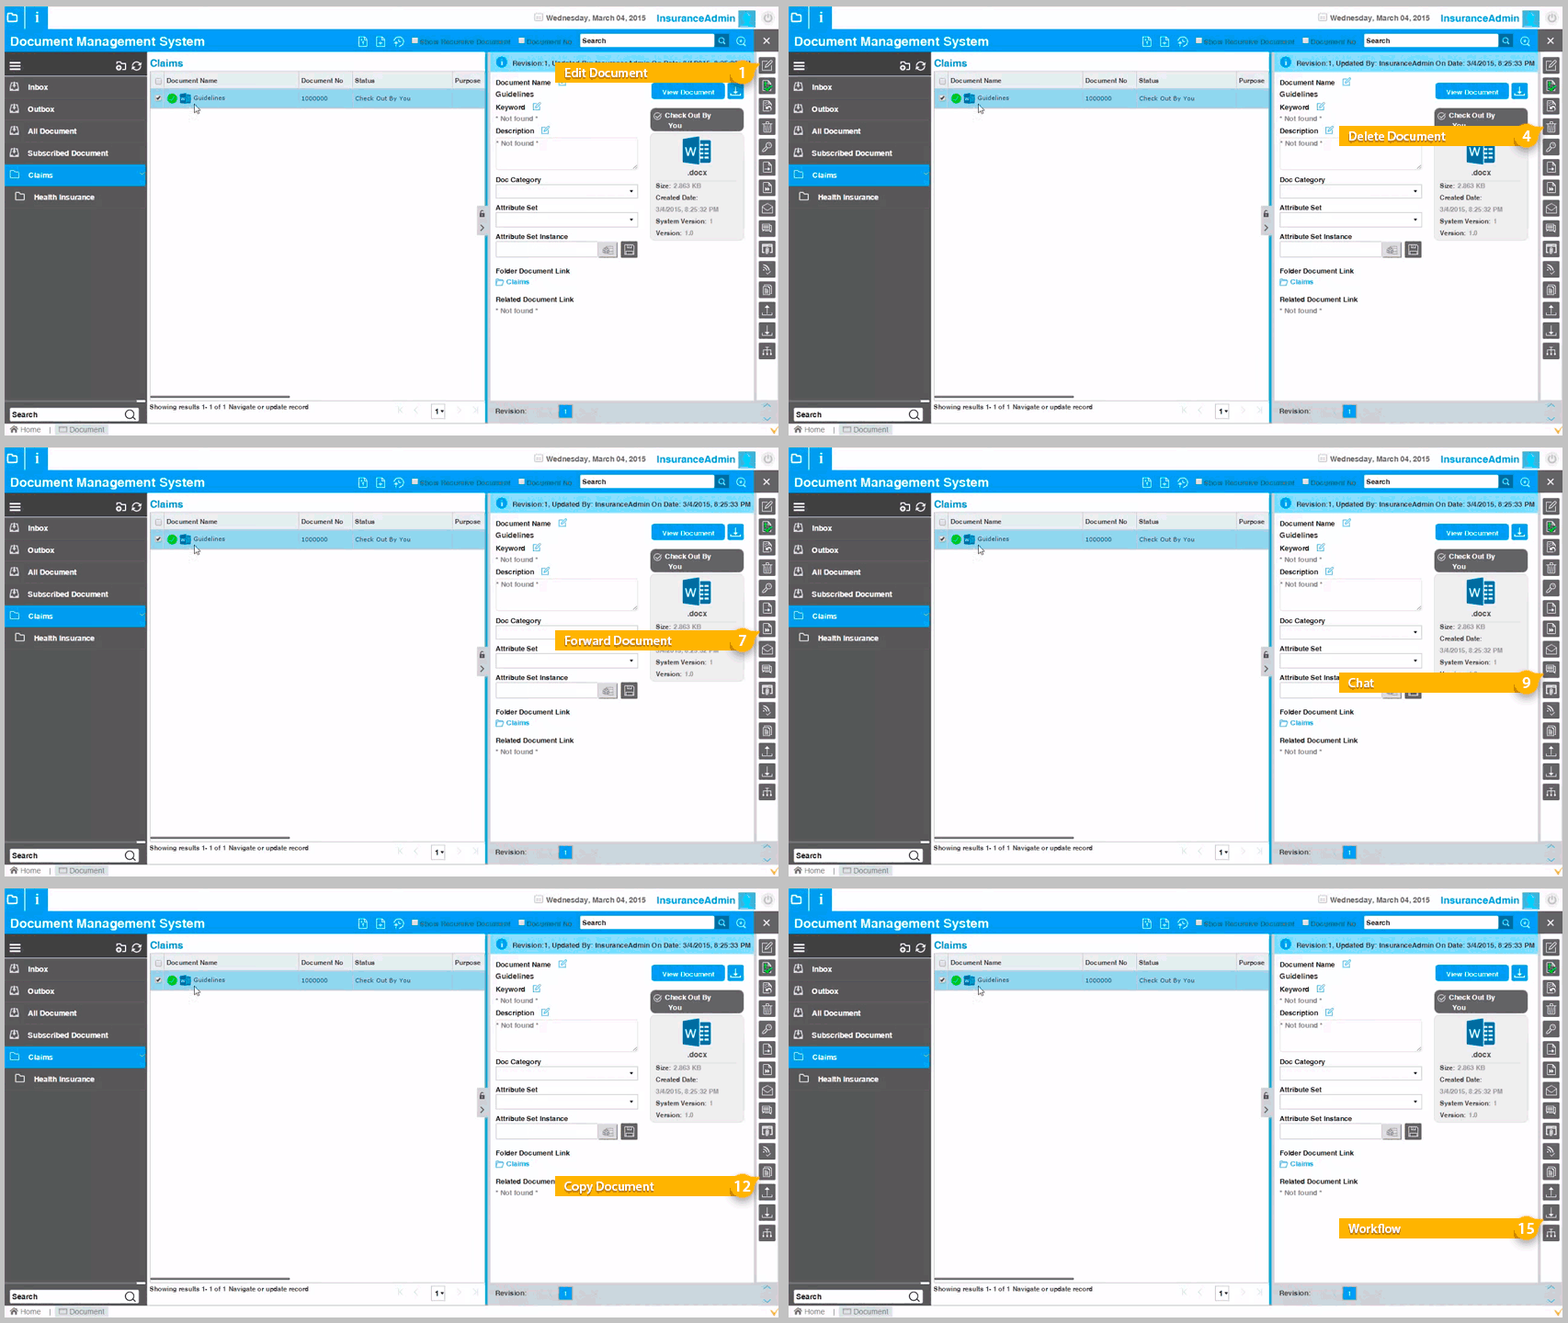
Button #1: Edit Document
Edit Document button allow users to edit the document within the system. User can only edit the document if the document type is Word file, Text file and Open Office file.
To edit the document:
[1] Click on the Edit Document button in the document action panel of DMS window.
[2] A new window will open as shows in the picture below.
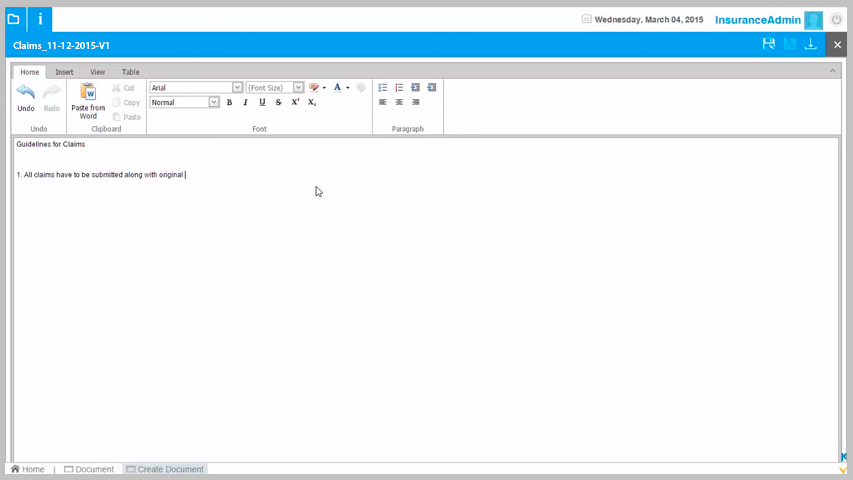
Following action can be performed in this window:
Edit document data: New window will be opened and user can edit the document data as per the document format.
Paste from Word: User can paste the data in this window from other word files.
Change Font: User can change the font size, font type, font color and paragraph settings.
Save Document: To save the document user need to click on the save button available on the top of right side of document. A new window will open in which the user needs to enter:
- Document name
- Folder name – it will be auto populated or user can choose other folder to save the document,
- Select document category
- Select file format. The user can save the document in 5 different file formats: Word, Open Document, PDF, RTF and Text format.
Download Document: User can also download the document by click on the download button available on the top of right side of document.
Button #2: Document Check Out
Document check out is the functionality, in which a freezed (Checked In) document can be unfreezed to change or edit. It is the second button in the document action panel. There are two options to edit the document in check out:
[1] By using the edit document option to edit the selected document or
[2] By clicking on the Load Attachment check box and document will be opened in new window.
Button #3: Undo Check Out
Undo Check Out option is used to revert the check out functionality. This action button is enabled whenever a user checks out a selected document.
After a document is checked out, the button icon will be change into a “green color tick mark” and the action name, “Check out”, will be changed into “Check In”. Undo check out button will be enable.
Button #4: Delete Document
Delete Document is the option to delete the documents uploaded in the system. Users can delete any document using this button from the document action panel. In order to be able to delete a document, the user has to have a permission to delete it. If user does not have the permission to delete a certain document, the delete button will be disabled.
To delete a document follow this steps:
[1] Select a document
[2] Click on the on Delete Document button in the document action panel
[3] New pop up window will open as shows in the picture below.
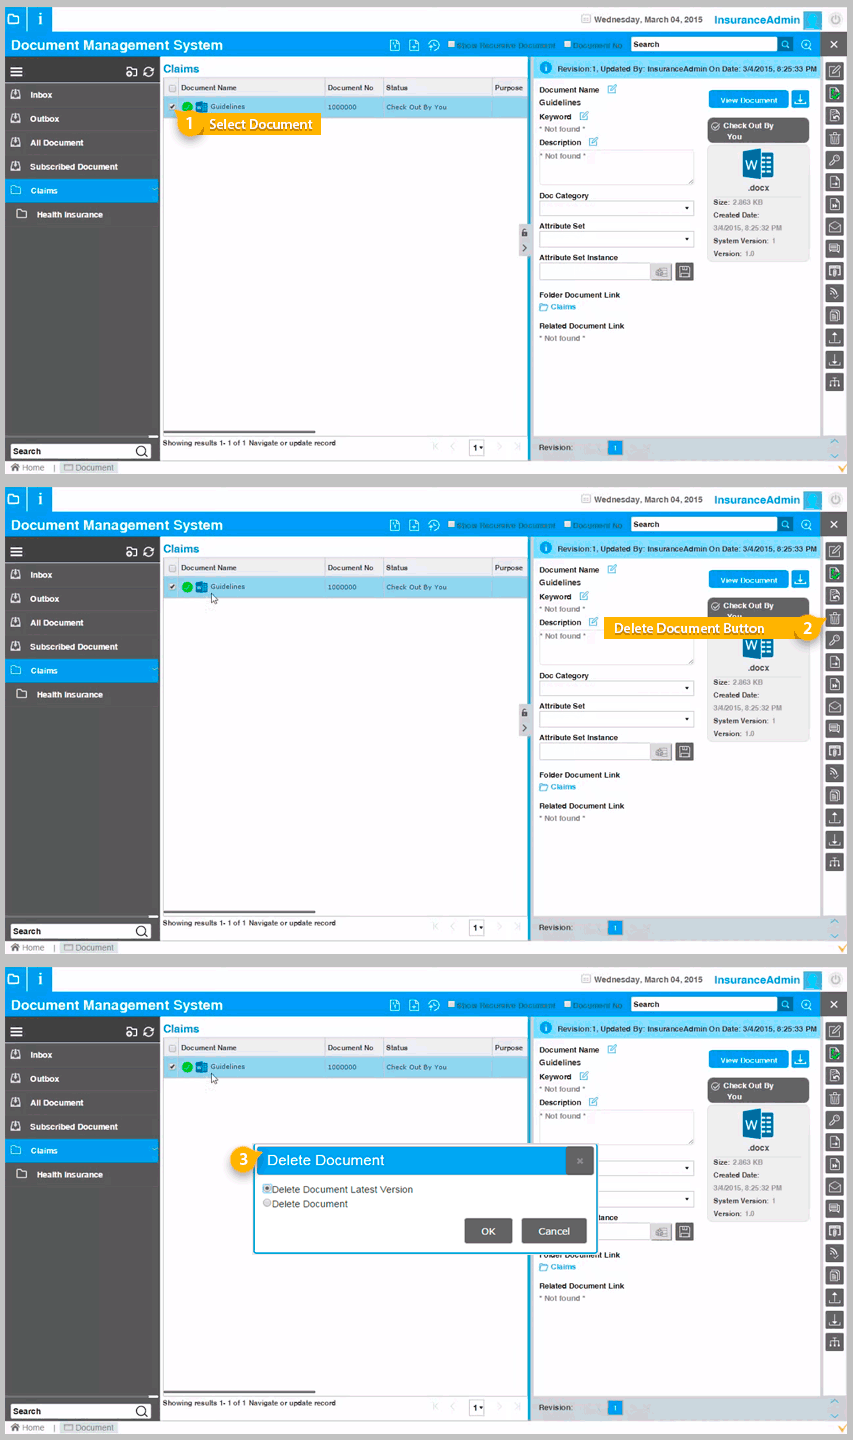
While deleting the document, the user has 2 options:
- Delete Document Latest Version – allow users to delete the latest version of the document. Previous version will remain in the system.
- Delete Document – allow users to delete the all versions of the document.
After selecting the delete option click on the ‘OK’ button and document will be deleted from the system.
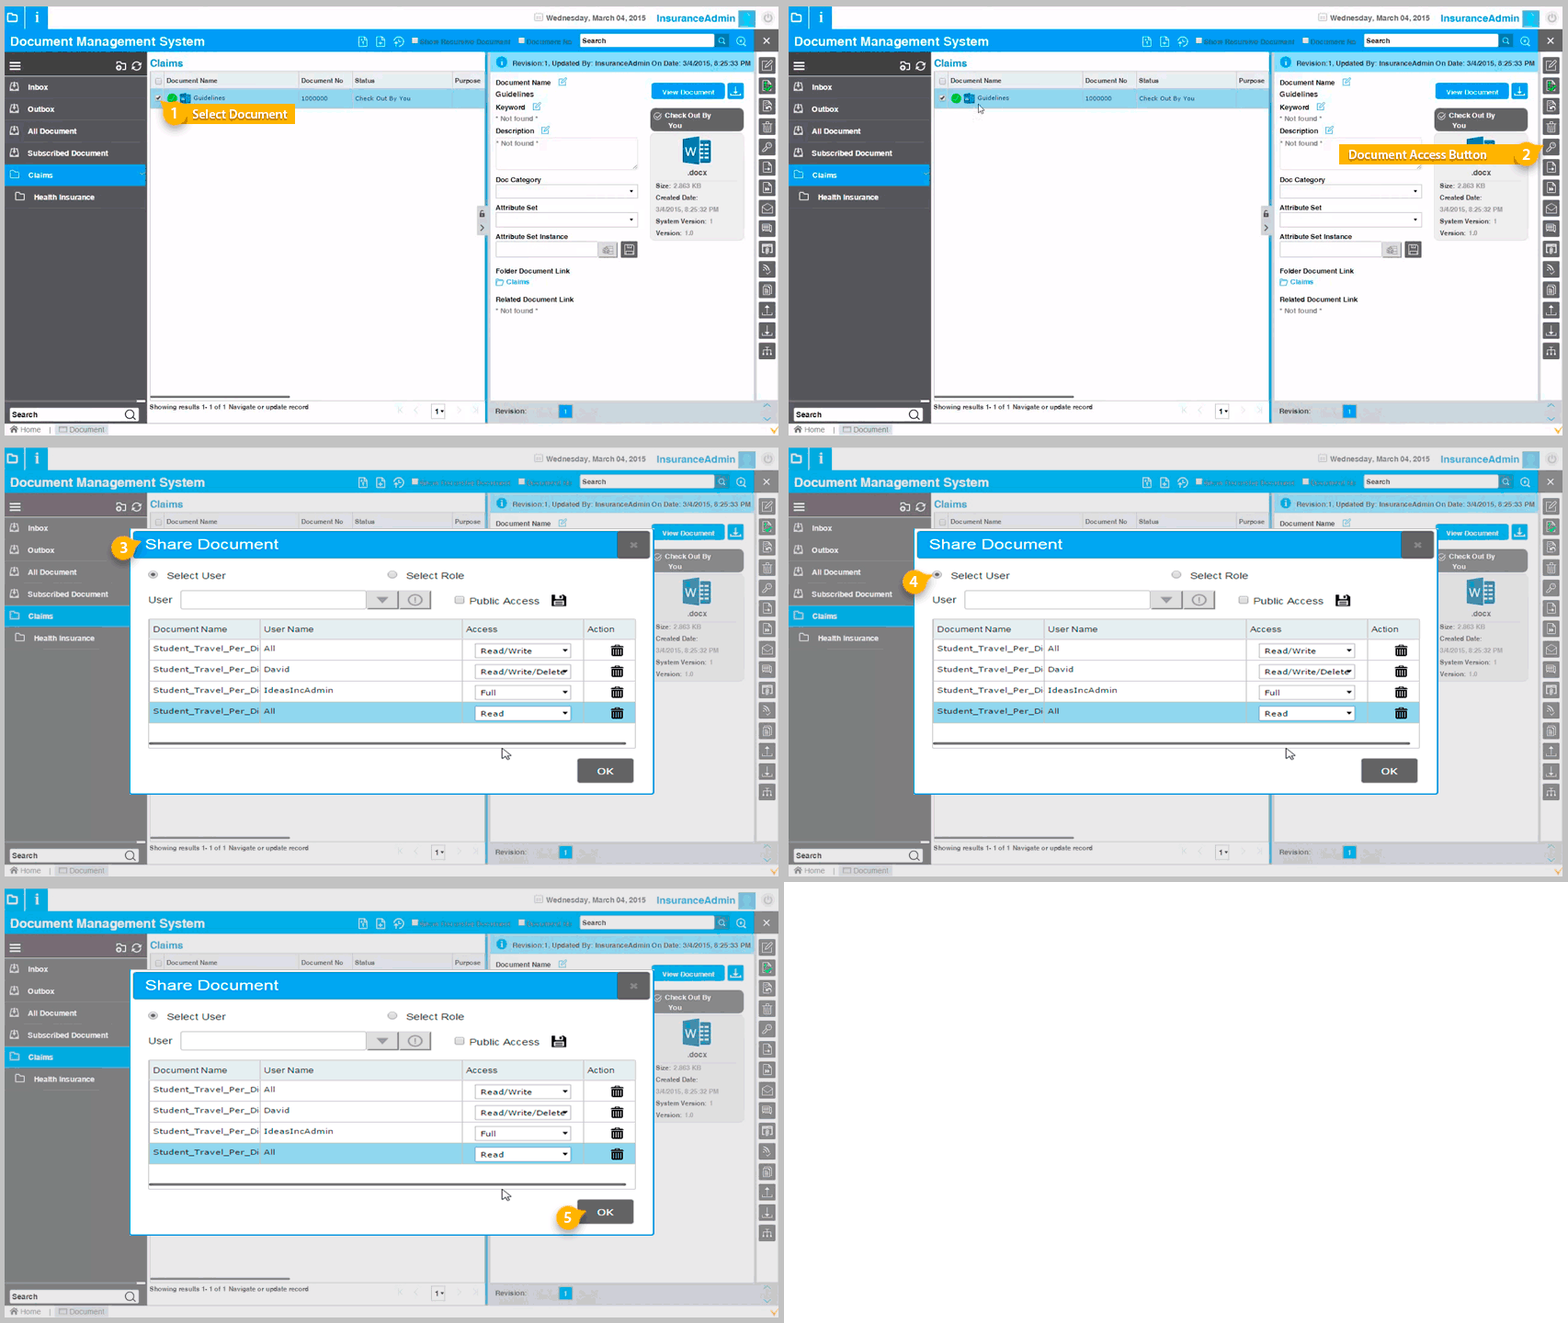
Button #5: Document Access
This action is used to give a permissions to different users to access a particular document. Document permission can be granted based on the User or the Role.
User based
In user based access option, you need to select the users with who you want to share the folder.
You can provide the following 5 levels of access:
[1] Full Permission on any document.
[2] Read/Write/Delete. Includes permission to change and edit the document, to delete the document, or move the document.
[3] Read/Write. Includes permission to change and edit the document.
[4] Read. Includes permission to only view the document.
[5] None. User cannot view this document.
To give the access permission to a user follow this steps:
[1] Select the document
[2] Click on the Document access action button in the document action panel
[3] A new pop up window will open as shows in the picture below.
[4] Choose “Select User” radio button and define the level of access
[5] Click “OK”
Role based
In role based permission to access option, user needs to select the role of the user to give permission to access. The user can provide the same 5 level access as define in the above point.
To give the access permission to a role follow this steps:
[1] Select the document
[2] Click on the Document Access button in the document action panel
[3] A new pop up window will open as shows in the picture in the above point
[4] Choose “Select Role” radio button and define the level of access
[5] Click “OK”
Button #6: Move Document
This option is used to move a document from one folder to another folder. If user wants to move a document, than it is necessary that the user have “Read/Write/Delete” or “Full” permission on this document. Moreover, the user needs to have a “Read/Write”, “Read/Write/Delete” or “Full” permission in the targeted folder where he/she wants to move the document. User can move the documents from one folder to another folder or sub folder.
To move the document from one folder to another folder/subfolder follow this steps:
[1] Select the document
[2] Click on the Move Folder button in the document action panel
[3] A new pop up window will open as shown in the picture below.
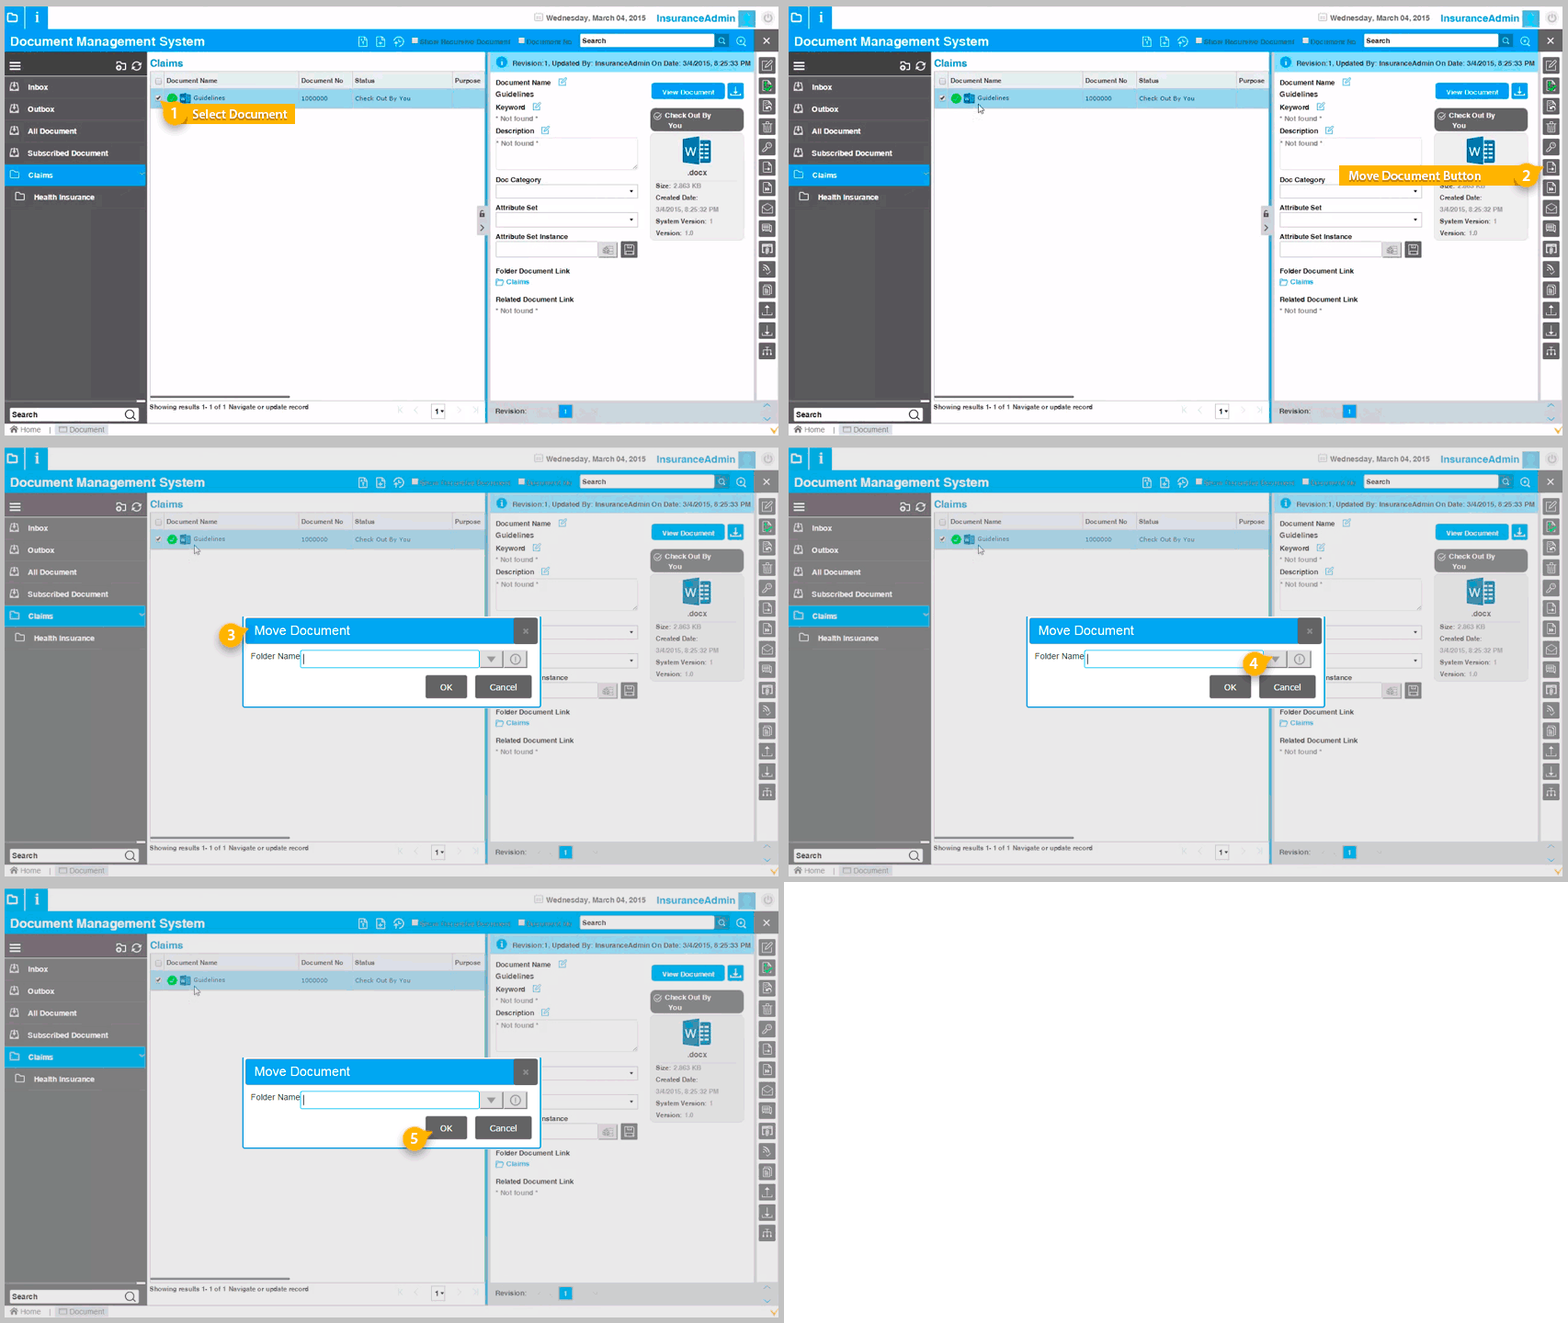
[4] User need to select the folder / sub-folder in which document to be moved. To find the folder/sub-folder click on the search button.
[5] Click “OK”
Note: User can also move multiple documents. Just select multiple documents and click on move document button. Select target folder and click on “Ok” button.
Button #7: Forward Document
This button is used to forward documents to a specific team, user or a role. Forward document is not depends upon permissions. Even a user who has only “Read” permission can forward document to any other user. When you forward document to another user this document goes from your outbox to the inbox of the recipient user. Users have two options: to forward the documents “with document number” or “without document number”.
1. Forward document with document number
If user selects the option “with document number”, user can forward the document only for a specific team. In this case the user needs to select “from team” and “to team” while forwarding because the system will create an In/Out document number according to the team format given in the system.
To forward the document with document number follow this steps:
[1] Select the documewnt
[2] Click on the forward button in the document action panel
[3] A new pop up window will open
[4] Select the radio button “With document number”
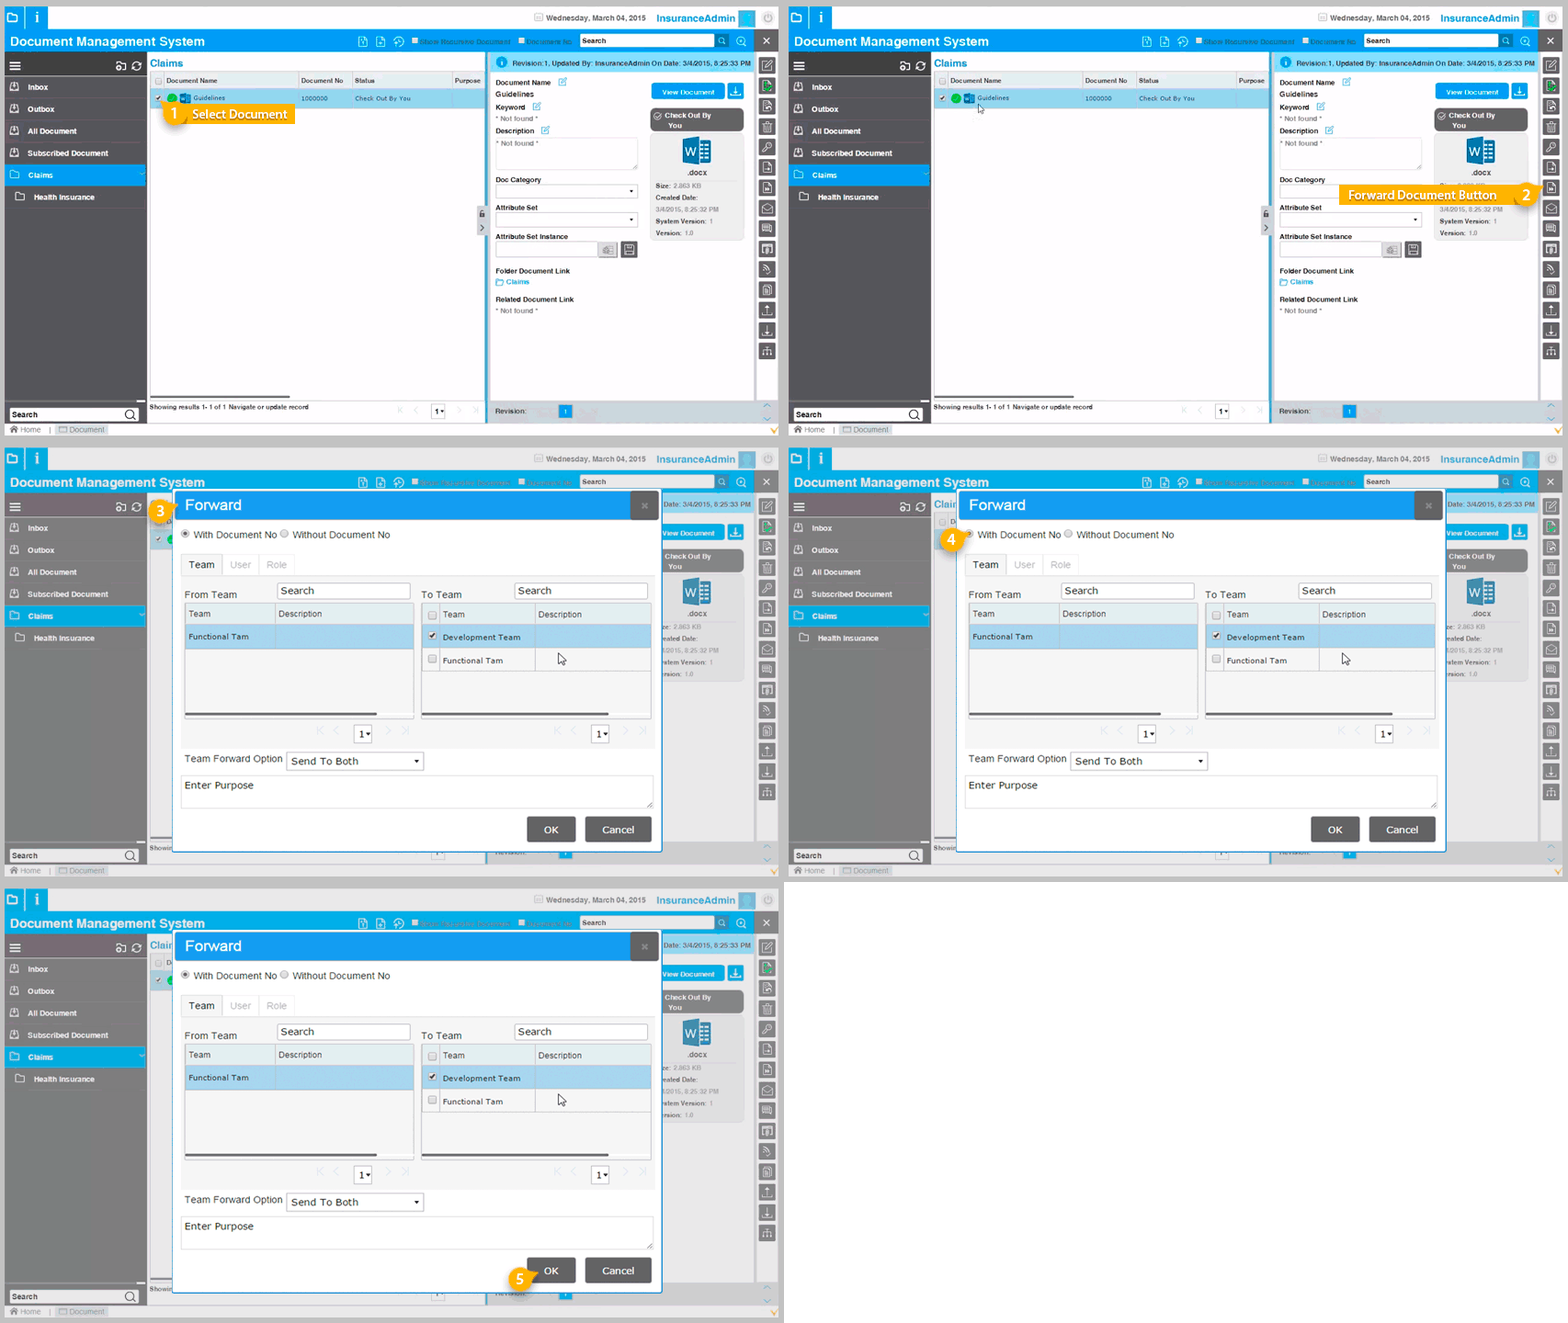
The user can search the teams by entering the team name in search box. After selecting the team select the Team Forward option from the drop down list.
- Send to both: means document is forwarded to team members and supervisor
- Sent to Team Members: means document forwarded only to team members
- Send to Team Supervisor: means document forwarded only to team supervisor
[5] When you are done click “OK”
2. Forward document without document number
If user selects the option “without document number”, user can forward the document to team, another user or role.
To forward the document without document number follow this steps:
[1] Select the documewnt
[2] Click on the forward button in the document action panel
[3] A new pop up window will open
[4] Select the radio button “Without document number”
[5] Select a Team / User / or Role to which you want to forward the document
Forward to Team
To forward the document to team follow the same steps as show in the forward document with document number guide.
Forward to User
[1] Select the document
[2] Click on the forward button in the document action panel
[3] A new pop up window will open.
[4] Select “Without document number” radio button
[5] Click on the “User” tab and select the users to who you want to forward the document
[6] Click “OK”
Forward to Role
[1] Select the document
[2] Click on the forward button in the document action panel
[3] A new pop up window will open.
[4] Select “Without document number” radio button
[5] Click on the “Role” tab and select the roles to which you want to forward the document
[6] Click “OK”
The remaining buttons of the Document Action Panel are explained in the following article: [Part 2] What can you do with the Document Action Panel in VIENNA Advantage DMS?
Would you like to read more articles related to VIENNA Advantage Document Management System? Check our Blog category: Document Management Tips

One comment on “[1/2] What can you do with the Document Action Panel in VIENNA Advantage DMS?”
[…] This is the second part of the article that explains the Document Action Panel in VIENNA Advantage DMS. We suggest to check the first part of this article before you continue reading this one: What can you do with the Document Action Panel in VIENNA Advantage DMS? [1/2]? […]